
관련: 지식인
아래아한글로 문서작업할 때
Shift+Tab 기능을 통해 현재 커서위치를 다음 줄부터 내어쓰기 위치로 지정해줍니다.
파워포인트에서는 지원하지 않는 단축키 기능입니다.
들여쓰기(내어쓰기)할 위치를 프로그램에 알려줘야 하는데요.
단락 서식에서 사용자가 직접 숫자로 입력하거나 화면에서 마우스로 표시를 해줘야합니다.
빠르게 마우스로 위치를 표시하려면 보기메뉴 > '눈금자'를 체크해서 켜세요.
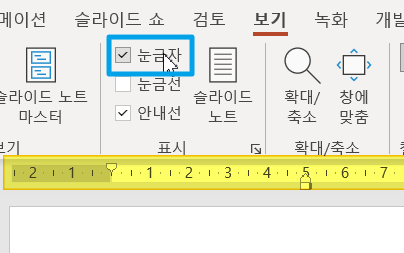
그러면 눈금자 왼쪽에 모래시계모양 돌출된 마커가 있습니다.

맨아래 3번 네모는 전체단락 들여쓰기,
2번 아래 세모는 전체 들여쓰기와 동시에 첫줄은 내어쓰기 적용(2,3번은 항상 동시에 이동),
1번 세모는 첫줄만 들여쓰기입니다.
이제 모래시계 아래 부분 2번 세모 눈금표시를 (2번째줄부터) 들여쓰기할 위치로 마우스로 옮겨주세요.
그러면 단락 서식이 아래와 같이 변경됩니다.
해당 단락이 전체적으로 뒤로 들여쓰기가 적용되고 첫줄만 앞으로 내어쓰기가 적용됩니다.
(그래서 텍스트 앞 들여쓰기 값과 첫줄 내어쓰기 값이 일치합니다.)

단락 서식은 해당 단락범위내에 적용됩니다. 단락은 엔터로 구분이 됩니다.
만일 단축키로 하려면
아래코드를 Alt-F11창에 모듈 추가 후 모듈창안에 넣어두고
빠른 실행 아이콘에 매크로를 추가해서
Alt+숫자키로 실행할 수 있습니다.
먼저 들여쓰기할 위치의 텍스트영역을 선택하고 단축키를 실행해야합니다.
Sub IndentExceptFirstLine()
    Dim para As TextRange2
    Dim ind As Single

    With ActiveWindow.Selection
        If .Type <> ppSelectionText Then MsgBox "텍스트를 선택하세요.": Exit Sub

        '현재 첫번째 단락만 적용
        Set para = .TextRange2.Paragraphs(1)

        'ind = 선택텍스트 x좌표 - 도형x좌표 - 도형내 왼쪽 여백
        ind = para.BoundLeft - .ShapeRange(1).Left - .ShapeRange(1).TextFrame.MarginLeft
        '단락전체 들여쓰기
        para.ParagraphFormat.LeftIndent = ind
        '첫번째줄 들여쓰기(음수이면 내어쓰기)
        para.ParagraphFormat.FirstLineIndent = -ind

    End With

End Sub
실행화면:
샘플 파일 첨부합니다.
(단, pptm파일이 열려있어야 단축키 실행이 가능하므로 AutoHotKey로 만드는 것이 더 좋긴 합니다.)
그래서 AutoHotKey 로 만들어 보았습니다.
#NoEnv  ; Recommended for performance and compatibility with future AutoHotkey releases.
; #Warn  ; Enable warnings to assist with detecting common errors.
SendMode Input  ; Recommended for new scripts due to its superior speed and reliability.
SetWorkingDir %A_ScriptDir%  ; Ensures a consistent starting directory.
CoordMode, Pixel, Screen
#SingleInstance

;; Scroll PowerPoint Slideview


MsgBox, 0x40, Indenter, Select the text area and press <F3>/<F4> to set/reset the hanging indentation.`n`nPress <Win+x> to quit.

	;Menu, Tray, Icon,, %A_ScriptFullPath%, 1
	Menu, Tray, Icon, shell32.dll, 250
	Menu, Tray, Tip, [F3] Set the hanging indentation [F4] Reset the indentation [Win+X]: Exit
	Menu, Tray, NoStandard
	Menu, Tray, Add, Exit, ExitMenu
	return


F3::
	ppt:=ComObjActive("PowerPoint.Application")
	ppt.Visible := True
	IfWinActive, ahk_exe POWERPNT.EXE
	{
		if (ppt.ActiveWindow.Selection.type !=3) {
			MsgBox,들여쓰기할 위치의 텍스트를 선택하세요.
			return
		}

       ;현재 첫번째 단락만 적용
	    para:=
        try para := ppt.ActiveWindow.Selection.TextRange2.Paragraphs(1)
        catch e {
			MsgBox,들여쓰기할 위치의 텍스트를 선택하세요.
			return
		}
        ;ind = 선택텍스트 x좌표 - 도형x좌표 - 도형내 왼쪽 여백
        ind := para.BoundLeft - ppt.ActiveWindow.Selection.ShapeRange(1).Left - ppt.ActiveWindow.Selection.ShapeRange(1).TextFrame.MarginLeft
        ;단락전체 들여쓰기

        para.ParagraphFormat.LeftIndent := ind
        ;첫번째줄 들여쓰기(음수이면 내어쓰기)
        para.ParagraphFormat.FirstLineIndent := -ind

		ppt:=""
	}

	return

F4::
	ppt:=ComObjActive("PowerPoint.Application")
	ppt.Visible := True
	IfWinActive, ahk_exe POWERPNT.EXE
	{
		if (ppt.ActiveWindow.Selection.type !=3) {
			MsgBox,들여쓰기를 제거할 문단을 선택하세요.
			return
		}

       ;현재 첫번째 단락만 적용
	    para:=
        try para := ppt.ActiveWindow.Selection.TextRange2.Paragraphs(1)
        catch e {
			MsgBox,들여쓰기를 제거할 문단을 선택하세요.
			return
		}

        para.ParagraphFormat.LeftIndent := 0
        ;첫번째줄 들여쓰기(음수이면 내어쓰기)
        para.ParagraphFormat.FirstLineIndent := 0

		ppt:=""
	}

	return
ExitMenu:
#x::
	ExitApp
실행하면 아래와 같은 창이 뜹니다.
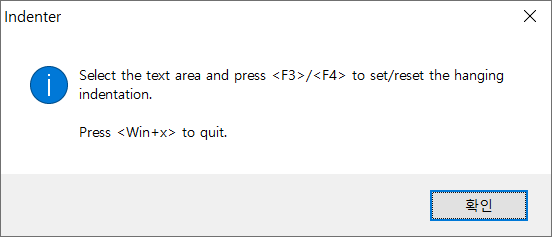
텍스트 상자의 해당 위치를 선택하고 F3을 누르면 선택한 텍스트위치에 들여쓰기와 첫줄 내어쓰기가 적용됩니다.
F4를 누르면 현재 선택한 텍스트 상자의 단락의 들여쓰기와 내어쓰기 값을 초기화해줍니다.
Win+X는 단축키를 종료합니다.

소스파일:
실행파일:
'AutoHotKey' 카테고리의 다른 글
| 도형 잠금 효과 구현 (0) | 2023.03.04 |
|---|---|
| 현재 셀에 일정 여백을 두고 정확히 그림 삽입하기 (2) | 2023.02.26 |
| PPT 도형 붙이기 (0) | 2023.02.11 |
| 두 개체 사이 거리를 다른 개체에 복사 적용 (0) | 2022.12.09 |
| 화면확대후 키보드로 슬라이드 화면스크롤하기 (1) | 2022.10.13 |
| 단축키로 프로그램 실행 또는 파일 열기 (0) | 2022.09.26 |
| AHK로 파워포인트 제어 : 모든 도형의 텍스트 윤곽선 없애기 (0) | 2022.08.13 |
| 오피스 단축키 만들기 (0) | 2022.07.23 |

최근댓글