관련: 지식인
파워포인트 표(테이블)의 특정 셀에 사진이나 그림을 삽입하고 싶은 경우
셀의 크기에 정확히 맞춰서 삽입하는 기능입니다.
VBA로 충분히 해당 기능을 만들어서 사용할 수 있지만
매크로 파일을 권한 허용해서 여는 과정이 번거로울 수 있어
바로 단축키로 실행할 수 있게 AutoHotKey로 만들어 보았습니다.

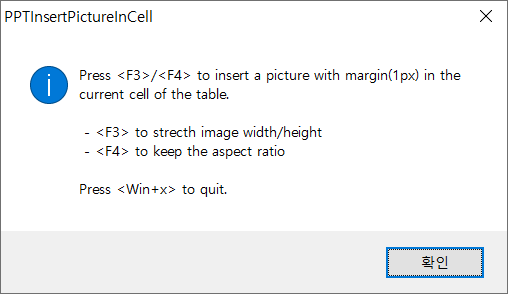
첨부한 exe파일을 실행하고 확인을 누르면 상태표시줄로 최소화됩니다.

이제 파워포인트 슬라이드에서 표의 특정 셀을 선택하고 F3 또는 F4를 누릅니다.
그 다음 원하는 그림파일을 선택하면 셀에 맞게 그림을 삽입해줍니다.
F3은 현재 셀에 맞게 원본 그림의 가로/세로를 늘려서 삽입하고
F4는 가로:세로 비율을 유지한 채로 셀에 맞게 삽입합니다.
아래 실행화면을 참고하세요.

현재 셀에 기존에 이미 사진이 있으면 삭제하고 삽입합니다.
테두리에 여백 1px을 두고 삽입합니다.
PPTInsertPicture_1.exe 이라는 파일명을 PPTInsertPicture_5.exe 로 바꾸면 5px로 여백이 늘어납니다.
Win+X를 누르면 종료합니다.
아래는 AutoHotKey v1.1 기준의 소스입니다.
#NoEnv  ; Recommended for performance and compatibility with future AutoHotkey releases.
; #Warn  ; Enable warnings to assist with detecting common errors.
SendMode Input  ; Recommended for new scripts due to its superior speed and reliability.
SetWorkingDir %A_ScriptDir%  ; Ensures a consistent starting directory.
CoordMode, Pixel, Screen
#SingleInstance

sName := % SubStr( A_ScriptName, 1, -4)
StringSplit, tmp, sName, _

if ( tmp2 = "") {
	m := 0
}
else {
	m := tmp2
}

MsgBox, 0x40, PPTInsertPictureInCell, Press <F3>/<F4> to insert a picture with margin(%m%px) in the current cell of the table.`n`n
 - <F3> to strecth image width/height `n - <F4> to keep the aspect ratio`n`nPress <Win+x> to quit.
	StringLeft, Ver, A_OSVersion, 7
	if (Ver >= "10.0.22") {
		Id := 325
	} else {
		Id := 327
    }
	Menu, Tray, Icon, shell32.dll, %Id%
	Menu, Tray, Tip, <F3>/<F4> to insert a picture in cell  [Win+X]: Exit
	Menu, Tray, NoStandard
	Menu, Tray, Add, Exit, ExitMenu
	return


$F3::
$F4::
 	ppt:=ComObjActive("PowerPoint.Application")
	ppt.Visible := True
	IfWinActive, ahk_exe PowerPnt.EXE
	{

		;find current cell
		try {
			tShp := ppt.ActiveWindow.Selection.ShapeRange(1)
			r := tShp.Table.Rows.Count
		}
		catch e {
			MsgBox Select a table cell first.
			return
		}
		Found := false
		Loop %r%
		{
			c := tShp.Table.Columns.Count
			Loop %c%
			{
				;MsgBox % tShp.Table.Cell(r, c).Selected
				if (tShp.Table.Cell(r, c).Selected = true) {
					Found := true
					break 2
				}
				c--
			}
			if(Found = true) {
				break
			}
			r--
		}
		;MsgBox ( %r% , %c%  ) , %Found%

        if(Found = false)
			return

		;Select an image
		path := ppt.ActivePresentation.Path . "\"
		;sFile := ppt.GetOpenFilename("Image File, *.jpg; *.png; *.gif; *.emf; *.svg")
		FileSelectFile, sFile, 1, %path%, Select image, Image File ( *.jpg;*.png;*.gif;*.emf;*.svg)
		if (sFile = "") {
			return
		}

		;delete old images if any
		sld := tShp.Parent
		i := sld.Shapes.Count
		shLeft := tShp.Table.Cell(r,c).Shape.Left
		shTop := tShp.Table.Cell(r,c).Shape.Top
		shWidth :=tShp.Table.Cell(r,c).Shape.Width
		shHeight := tShp.Table.Cell(r,c).Shape.Height
		;MsgBox % shLeft  shTop
		Loop, %i%
		{
			cShp := sld.Shapes(i)
			;13 = msoPicture
			if (cShp.Type = 13) {
				If (cShp.Left >= shLeft and cShp.Left + cShp.Width <= shLeft + shWidth and cShp.Top >= shTop and cShp.Top + cShp.Height <= shTop + shHeight) {
					cShp.Delete
				}
			}
			i--
        }

		;m := 5
		shp := tShp.Table.Cell(r,c).Shape
		pLeft := shp.Left + m
		pTop := shp.Top + m
		pWidth := shp.Width - m * 2
		pHeight := shp.Height - m * 2
		;MsgBox, % pLeft "," pTop "," pWidth "," pHeight

		;insert the image
		pShp := sld.Shapes.AddPicture(sFile, 0, 1, pLeft, pTop, pWidth, pHeight)

		;Keep the ApectRatio of the picture
		if (A_ThisHotkey = "$F4") {
			pShp.ScaleWidth(1, true)
			pShp.ScaleHeight(1, true)
			pShp.LockAspectRatio := true
			if (pShp.Width > pShp.Height) {
				pShp.Width := pWidth
				if (pShp.Height > pHeight) {
					pShp.Height := pHeight
				}
			}
			else {
				pShp.Height := pHeight
				if (pShp.Width > pWidth) {
					pshp.Width := pWidth
				}
			}
			pShp.Left := pLeft + (pWidth - pShp.Width)/2
			pShp.Top := pTop + (pHeight - pShp.Height)/2
		}
        SplitPath, sFile, name
		pShp.Name := name

		ppt:=""
	}
	return

ExitMenu:
#x::
	ExitApp
소스와 실행파일 첨부합니다.
이번에는 파일을 불러오는 대신 클립보드 이미지를 붙여넣는 경우입니다.
첨부한 PptPastePicture_0.exe 를 다운로드 하고 실행하세요.

'확인'을 누르면 상태표시줄로 최소화됩니다.
이제 파워포인트 슬라이드에서 슬라이드를 선택하고
F3이나 F4를 누르면 됩니다. F3은 아래 2,5번 슬라이드처럼 클립보드 이미지로 슬라이드를 비트맵으로 붙여넣은 다음 가득 채우고 F4는 아래 3,6번 슬라이드처럼 가로/세로 비율을 유지하면서 붙여 넣습니다.

만약 테이블의 셀을 선택한 상태면 해당 셀을 가득 채우거나(F3) 비율을 유지한 채로(F4) 붙여넣습니다.

실행파일의 이름이 PptPastePicture_0.exe 인데 숫자 0은 여백을 나타냅니다.
PptPastePicture_5.exe 로 파일이름을 바꾸면 테두리에 5픽셀 여백을 두고 삽입하게 됩니다.
Win+X를 누르거나 상태표시줄 아이콘을 우클릭하고 Exit를 선택하면 종료합니다.
ahk 소스와 exe 실행파일을 첨부합니다.
'AutoHotKey' 카테고리의 다른 글
| 폰트 색깔과 형광펜 색깔을 단축키로 빠르게 변경하기 (2) | 2024.03.23 |
|---|---|
| 발표자 보기 도구 창에서 '여러 슬라이드 보기' 유지하기 (0) | 2023.11.22 |
| 파워포인트 원하는 슬라이드로 바로 이동하기 (0) | 2023.07.02 |
| 파워포인트 다른 그림으로 바꾸기, 2가지 방법 (0) | 2023.07.02 |
| 도형 잠금 효과 구현 (0) | 2023.03.04 |
| 현재 셀에 일정 여백을 두고 정확히 그림 삽입하기 (2) | 2023.02.26 |
| PPT 도형 붙이기 (0) | 2023.02.11 |
| 두 개체 사이 거리를 다른 개체에 복사 적용 (0) | 2022.12.09 |


최근댓글