주어진 문자열을 한글자씩
각 슬라이드에 가득차게 분할하는 매크로를 만들어보았습니다.
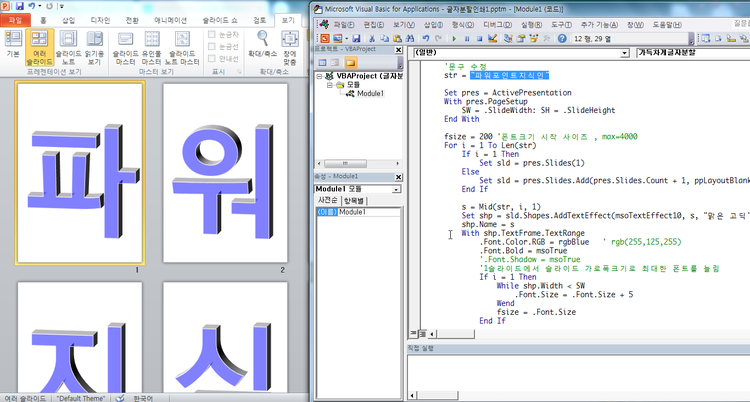
첨부파일 Alt-F11 눌러보면
str="파워포인트지식인" 에서
원하시는 문자열로 바꾸시고
F5로 매크로 실행해보세요.
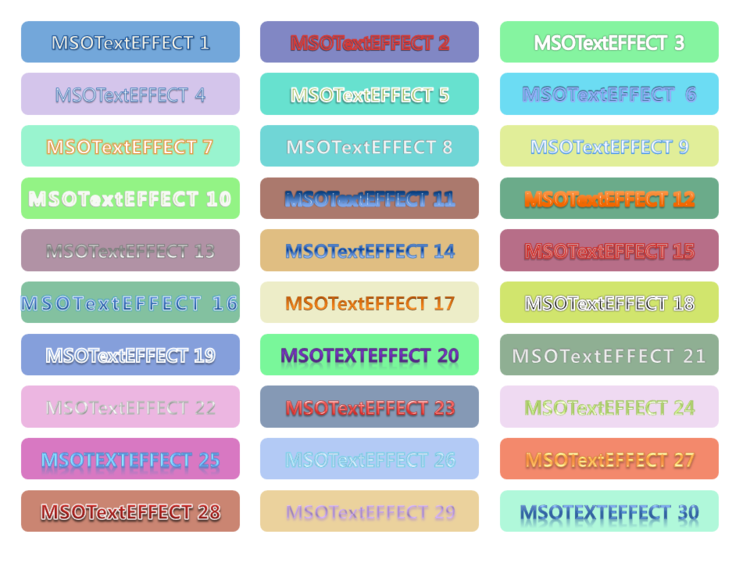
- msoTextEffect10 값을 바꾸면 효과가 바뀝니다.
- .Font.Color.RGB = rgbBlue ' rgb(255,125,255) 여기서 Font 색깔도 바꿀 수 있습니다.
- 소스 아래쪽에 3차원 효과를 원하지 않으면 주석처리하세요.
매크로는 아래와 같습니다.
Sub 가득차게글자분할()

    Dim pres As Presentation
    Dim sld As Slide
    Dim shp As Shape
    Dim str As String, s As String
    Dim SW As Single, SH As Single
    Dim i As Integer
    Dim fsize As Single

    '문구 수정
    str = "파워포인트지식인"

    Set pres = ActivePresentation
    With pres.PageSetup
        SW = .SlideWidth: SH = .SlideHeight
    End With

    fsize = 200 '폰트크기 시작 사이즈 , max=4000
    For i = 1 To Len(str)
        If i = 1 Then
            Set sld = pres.Slides(1)
        Else
            Set sld = pres.Slides.Add(pres.Slides.Count + 1, ppLayoutBlank)
        End If

        s = Mid(str, i, 1)
        Set shp = sld.Shapes.AddTextEffect(msoTextEffect10, s, "맑은 고딕", fsize, msoTrue, msoFalse, 0, 0)
        shp.Name = s
        With shp.TextFrame.TextRange
            .Font.Color.RGB = rgbBlue   ' rgb(255,125,255)
            .Font.Bold = msoTrue
            '.Font.Shadow = msoTrue
            '1슬라이드에서 슬라이드 가로폭크기로 최대한 폰트를 늘림
            If i = 1 Then
                While shp.Width < SW
                    .Font.Size = .Font.Size + 5
                Wend
                fsize = .Font.Size
            End If

        End With
        '3차원 돌리기
        With shp.TextFrame2
            '.WordArtFormat = msoTextEffect10
            .ThreeD.Depth = 100
            .ThreeD.RotationX = -10
            .ThreeD.RotationY = 10
            '.ThreeD.BevelTopDepth = 100
            '.ThreeD.BevelTopInset = 100
            '.ThreeD.BevelBottomInset = 100
            '.ThreeD.BevelBottomDepth = 100
        End With

        '슬라이드 가운데로
        shp.Left = SW / 2 - shp.Width / 2
        shp.Top = SH / 2 - shp.Height / 2
    Next i


End Sub
참고로 msoTextEffect 미리설정된 효과는 아래와 같습니다.
지식인링크:
https://kin.naver.com/qna/detail.nhn?d1id=1&dirId=102&docId=330291802&page=1#answer1
2025.2월 버전 추가합니다.
Option Explicit

Const FontName As String = "맑은 고딕"      ' 글자 폰트
Const FontColor As Long = rgbBlack           ' 글자 색깔
Const Effect_WordArt As Boolean = True      ' 텍스트효과 > 변환 > 휘기 > 사각형(워드아트) 효과로 가로/세로 가득차게 늘리기
Const Effect_Eft As Boolean = False         ' 텍스트 효과 스타일 적용여부
Const Effect_3D As Boolean = False          ' 텍스트에 3차원 효과 적용 여부

Sub 한글자씩가득차게분할()

    Dim pres As Presentation
    Dim sld As Slide
    Dim shp As Shape
    Dim str As String, s As String
    Dim SW As Single, SH As Single
    Dim i As Integer
    Dim fsize As Single

    '문구 수정
    str = "새해복많이받으세요!"    '"파워포인트지식인"
    str = InputBox("각 슬라이드에 한 글자씩 가득차게 분할할 문구를 입력하세요.", , str)
    If str = "" Then Exit Sub

    Set pres = ActivePresentation
    With pres.PageSetup
        SW = .SlideWidth: SH = .SlideHeight
    End With

    fsize = 200 '폰트크기 시작 사이즈 , max=4000
    If pres.Slides.Count = 0 Then Set sld = pres.Slides.Add(pres.Slides.Count + 1, ppLayoutBlank)
    For i = 1 To Len(str)
        If i = 1 Then
            Set sld = pres.Slides(pres.Slides.Count)
        Else
            Set sld = pres.Slides.Add(pres.Slides.Count + 1, ppLayoutBlank)
        End If

        s = Mid(str, i, 1)
        '텍스트 효과 삽입 혹은 일반 텍스트 상자 삽입
        If Effect_Eft Then
            Set shp = sld.Shapes.AddTextEffect(msoTextEffect23, s, FontName, fsize, msoTrue, msoFalse, 0, 0)
        Else
            Set shp = sld.Shapes.AddTextbox(msoTextOrientationHorizontal, 0, 0, SW, SH)
            shp.TextFrame.TextRange.Font.Name = FontName
            shp.TextFrame.TextRange.Text = s
            shp.TextFrame.MarginLeft = 0:   shp.TextFrame.MarginRight = 0
            shp.TextFrame.MarginTop = 0:    shp.TextFrame.MarginBottom = 0
        End If

        shp.Name = s
        With shp.TextFrame.TextRange
            shp.TextFrame.VerticalAnchor = msoAnchorMiddle
            shp.TextFrame.HorizontalAnchor = msoAnchorCenter
            .Font.Color.RGB = FontColor 'rgbBlue   ' rgb(255,125,255)
            .Font.Bold = msoTrue
            '.Font.Shadow = msoTrue

            '첫글자에서 슬라이드 가로폭크기로 최대한 폰트를 늘림
            If Effect_Eft Then
                If i = 1 Then
                    While shp.Width < SW
                        .Font.Size = .Font.Size + 5
                    Wend
                    fsize = .Font.Size
                End If
            Else
                If i = 1 Then
                    While .Characters(1).BoundWidth < SW
                    'While .BoundWidth - .BoundLeft * 2 < SW
                        .Font.Size = .Font.Size + 1
                    Wend
                    fsize = .Font.Size
                End If
            End If
            .Font.Size = fsize

            '텍스트 변환 > 사각형 (예전 워드아트 효과 적용 후 가로/세로 늘리기)
            If Effect_WordArt Then
                shp.TextFrame2.WarpFormat = msoWarpFormat37     '36번
                shp.LockAspectRatio = msoFalse
                shp.Width = SW
                shp.Height = SH
            End If
        End With

        '3차원 돌리기

        If Effect_3D Then
            With shp.TextFrame2
                '.WordArtFormat = msoTextEffect10
                .ThreeD.Depth = 100
                .ThreeD.RotationX = -10
                .ThreeD.RotationY = 10
                '.ThreeD.BevelTopDepth = 100
                '.ThreeD.BevelTopInset = 100
                '.ThreeD.BevelBottomInset = 100
                '.ThreeD.BevelBottomDepth = 100
            End With
        End If

        '슬라이드 가운데로
        shp.Left = SW / 2 - shp.Width / 2
        shp.Top = SH / 2 - shp.Height / 2
    Next i

    pres.PrintOptions.OutputType = ppPrintOutputSlides
    pres.PrintOptions.FitToPage = msoTrue


End Sub
1. Effect_WordArt = True ' 워드아트 늘리기 효과
기본적으로 텍스트효과 > 변환 > 휘기 > 사각형 효과(워드아트효과)를 이용해서 세로방향으로도 늘려서 글자가 슬라이드에 가득찹니다. 느낌표는 가로로 너무 늘어나는 부작용이 발생하니 다시 조절해주세요.
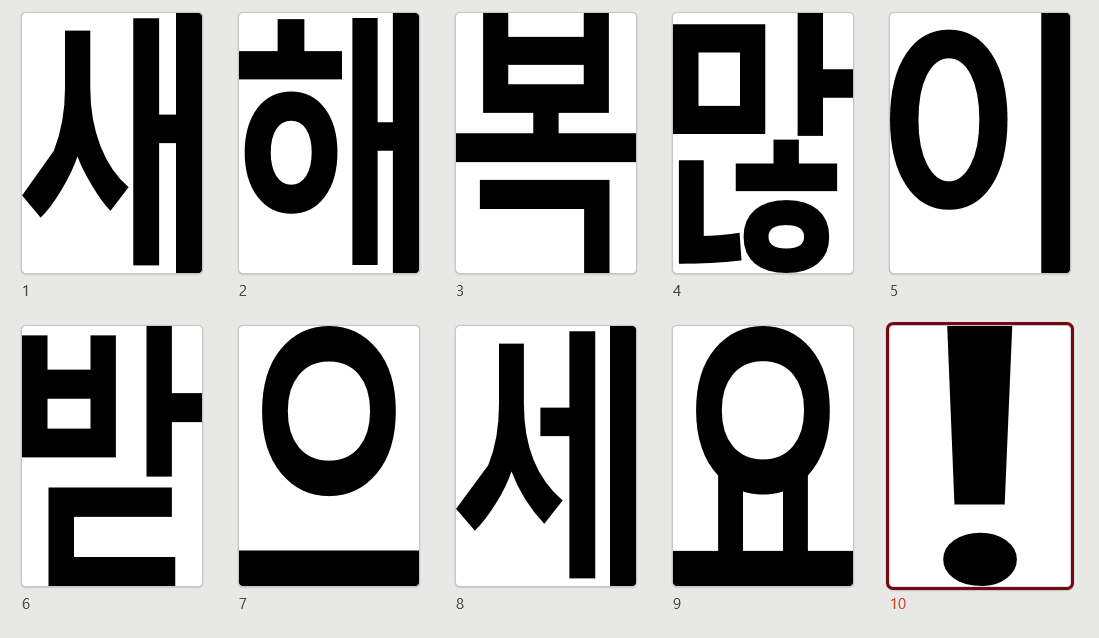
2. Effect_WordArt = False '늘리기 없이 순수 텍스트 상자
워드아트 세로로 늘리는 효과 없이 순수한 텍스트상자로만 넣은 경우

3. Effect_WordArt = False : Eftect_Eft = True '텍스트효과 스타일 적용, 늘리기 없이

4. Effect_WordArt = False : Eftect_Eft = False : Effect_3d = True '3D효과 적용, 늘리기 없고, 스타일 효과 없이
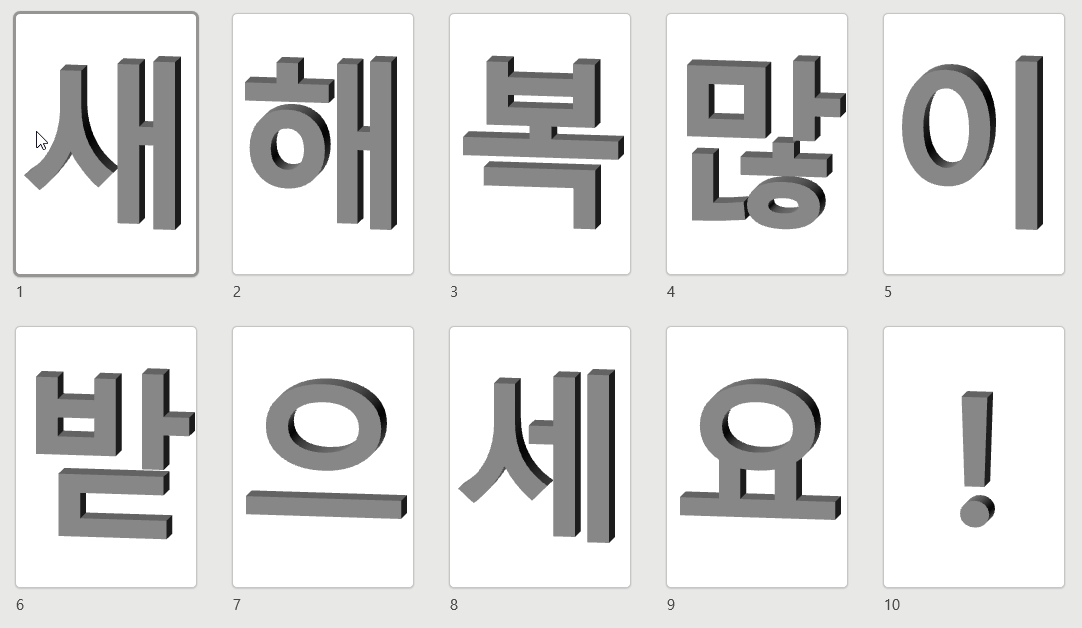
5. Effect_WordArt = True : Eftect_Eft = False : Effect_3d = True ' 3D효과적용, 스타일 없음, 늘리기 있음

6. Effect_WordArt = False : Eftect_Eft = True : Effect_3d = True ' 늘리기 없음, 스타일 적용, 3D 적용

코드상의 아래 부분을 위처럼 수정하면 약간씩 다른 모양으로 분할할 수 있습니다.
Const FontName As String = "맑은 고딕"      ' 글자 폰트
Const FontColor As Long = rgbBlack           ' 글자 색깔
Const Effect_WordArt As Boolean = True      ' 텍스트효과 > 변환 > 휘기 > 사각형(워드아트) 효과로 가로/세로 가득차게 늘리기
Const Effect_Eft As Boolean = False         ' 텍스트 효과 스타일 적용여부
Const Effect_3D As Boolean = False          ' 텍스트에 3차원 효과 적용 여부
- 텍스트 스타일 적용할 때 AddTextEffect( msoTextEffect23 으로 23번인데 수정해도 됩니다.
- 워드아트 효과 늘리기는 .WarpFormat = msoWarpFormat37 로 기본 사각형모양인데 이것도 수정하면 여러가지 모양이 가능합니다.
인쇄 옵션은 슬라이드전체 '용지에 맞게 크기 조정'으로 설정됩니다.
'PPT+VBA' 카테고리의 다른 글
| PPT 실시간 시계 또는 타이머 추가 (26) | 2019.12.17 |
|---|---|
| PPT 한글, 영문 폰트 및 기타 속성 일괄 변경하기 (19) | 2019.10.29 |
| 파워포인트에서 메뉴-서브메뉴 시스템 구현 (1) | 2019.09.05 |
| 여러 PPT안의 특정 단어 검색(도형 및 VBA 코드 포함 검색) (7) | 2019.07.07 |
| 슬라이드 이미지 분할 인쇄 및 저장 (3) | 2019.06.08 |
| VBA로 슬라이드 자동 생성 - '자주 쓰는 영어속담 50개' (4) | 2019.04.16 |
| ppt 슬라이드를 워드 Doc, PDF, txt 로 저장 (4) | 2019.04.05 |
| PPT, Excel 등 MS 오피스 Office 2010 버전 등 구하기 (4) | 2019.03.16 |

최근댓글