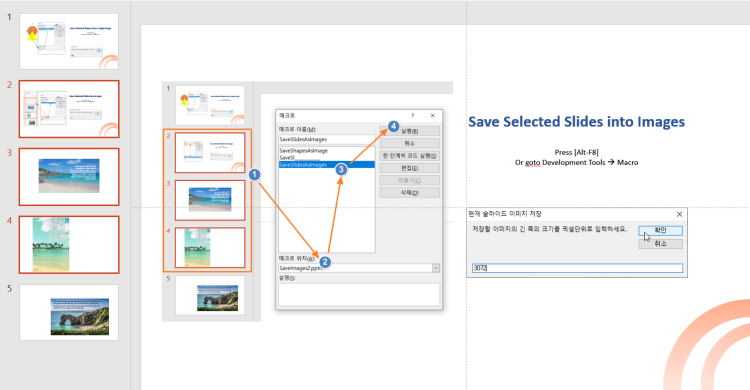
슬라이드상의 여러 그림, 텍스트박스, 도형을 하나로 묶어서 원하는 px크기의 이미지 1개(png 혹은 jpg)로 저장하거나
각 슬라이드를 통채로 원하는 px크기의 이미지로 각각 저장하려면
아래 첨부한 VBA 매크로파일을 이용해보시기 바랍니다.
|
실행방법은 첨부파일을 매크로 허용해서 열어두시고
자신의 파일을 연 다음 Alt-F8이나 개발도구->매크로 를 눌러서 매크로창이 뜨면
먼저 매크로 위치를 첨부파일(SaveAsImage2.pptm)로 한 다음
아래 두 가지 매크로를 실행하면 됩니다.
1번은 반드시 그림과 텍스트 상자를 동시에 선택하고 실행하고
2번은 원하는 슬라이드들을 선택 한 후에 매크로를 실행하세요.
|
🎅 현재는 png로 저장하나 원하는 압축률의 jpg로 저장하려면 JPGHigh =True로 바꾸세요.
1. SaveShapesAsImage: 현재 선택된 도형(그림과 텍스트 상자 등)을 주어진 px 크기대로 하나의 그림으로 저장.
여러개의 도형일 경우 그룹으로 만든 후에 저장함. (그룹으로 묶이지 않는 표 등은 에러 발생)

Option Explicit

Public Const Ext As String = "png"
Const ExtType As Integer = ppShapeFormatPNG
'Public Const Ext As String = "jpg"    '"emf"
'Const ExtType As Integer = ppShapeFormatJPG

Public Const JPEGHigh As Boolean = False
Public Const JPEGRate As Single = 95   'JPG화질(압축률)

Sub SaveShapesAsImage()

    Dim shpRng As ShapeRange
    Dim shp As Shape, shpEMF As Shape, sld As Slide
    Dim oldWidth As Single
    Dim usr As String, strFile As String, strEMF As String

    On Error Resume Next
    Set shpRng = ActiveWindow.Selection.ShapeRange
    On Error GoTo 0
    If shpRng Is Nothing Then MsgBox "먼저 저장할 개체(도형)을 선택하세요.", _
        vbInformation, "이미지로 저장": Exit Sub

    usr = InputBox("저장할 이미지의 긴쪽 크기를 px단위로 입력하세요", "그림으로 저장", 1024)
    If Not IsNumeric(usr) Then Exit Sub

    If shpRng.Count > 1 Then
        Set shp = shpRng.Group
        shp.Name = "temp_Group_" & shp.Id
    Else
        Set shp = shpRng(1)
    End If

    Set sld = shp.Parent
    '// 현재 선택된 개체를 그룹으로 만들고 긴쪽 길이를 원하는 px 크기의 이미지로 저장
    With shp

        strFile = getPath(shpRng(1).Name & shpRng(1).Id)    ' 대화창으로 저장파일명 얻기
        If Len(strFile) < 1 Then Exit Sub
        'oldWidth = .Width  '원래 가로 크기 저장
        '.Line.Visible = msoFalse
        '임시로 EMF로 저장 후 다시 삽입
        strEMF = strFile & ".emf"
        .Export strEMF, ppShapeFormatEMF
        DoEvents
        '.Width = oldWidth '원래 가로크기로 복구
        If .Type = msoGroup Then .Ungroup
    End With

    Set shpEMF = sld.Shapes.AddPicture(strEMF, msoFalse, msoTrue, 0, 0)
    DoEvents
    Kill strEMF

    With shpEMF
        .LockAspectRatio = msoTrue
        If .Width > .Height Then
            .Width = CInt(usr) * 0.75 '// 1px = 0.75pt
        Else
            .Height = CInt(usr) * 0.75 '// 1px = 0.75pt
        End If
        .Export strFile, ExtType
        DoEvents
        .Delete
    End With

    If JPEGHigh Then
        '압축률을 지정해서 변환 저장 / 기본 85
        Call WIA_ConvertImage(strFile, Left(strFile, InStrRev(strFile, ".")) & "jpg", JPEG, JPEGRate)
        Kill strFile 'png 삭제
    End If

End Sub

Function getPath(title As String) As String
    Dim i As Integer
    With Application.FileDialog(msoFileDialogSaveAs)
        .title = title & " 파일로 저장"
        .AllowMultiSelect = False
        .InitialFileName = ActivePresentation.Path & "\" & title & "." & Ext
        '.FilterIndex = 20
        For i = 1 To .Filters.Count
            If .Filters(i).Extensions = "*." & Ext Then .FilterIndex = i: Exit For
        Next i
        If .Show = -1 Then getPath = .SelectedItems(1)
    End With
End Function
- 텍스트 상자가 포함된 경우 확대해도 텍스트는 그대로이고 도형만 커지기 때문에 일단 임시로 EMF로 저장했다가 EMF를 다시 삽입한 다음 크기를 변경하고 다시 png나 jpg 로 저장하도록 했습니다.
- 선택된 도형에 텍스트 상자가 포함된 경우 텍스트상자가 전체 테두리에 너무 가까운 경우 저장 이미지의 크기가 더 커질 수도 있습니다.
2. SaveSlidesAsImages : 현재 다중 선택된 슬라이드들을 대상으로 슬라이드 통채로 주어진 px크기대로 각각 이미지로 저장

Option Explicit
Option Compare Text
'Private Const Ext As String = "png"

Sub SaveSl____________()

End Sub

Sub SaveSlidesAsImages()

    Dim sld As Slide
    Dim fname As String, usize As String
    Dim size As Single, w As Single, h As Single
    Dim i As Integer

    size = 3072 '2010버전의 경우 최대 3072px   '2019의 경우 9216px도 가능
    If Application.Version >= 15 Then size = 9216

    With ActivePresentation
        If Not .Saved Then MsgBox "파일을 먼저 저장해야합니다.", vbInformation: Exit Sub

        usize = InputBox("저장할 이미지의 긴 쪽의 크기를 픽셀단위로 입력하세요.", "현재 슬라이드 이미지 저장", size)
        If Not IsNumeric(usize) Then MsgBox "숫자로 입력하세요", vbInformation: Exit Sub
        size = CSng(usize)

        If .PageSetup.SlideOrientation = msoOrientationHorizontal Then
            w = size
            h = w * (.PageSetup.SlideHeight / .PageSetup.SlideWidth) ' 비율유지한 상태로 최대 크기
        Else
            h = size
            w = h * (.PageSetup.SlideWidth / .PageSetup.SlideHeight)
        End If
        'Debug.Print w, h

        For Each sld In ActiveWindow.Selection.SlideRange
            fname = .Path & "\" & Left(.Name, InStrRev(.Name, ".") - 1) & "_" & Format(sld.SlideIndex, "000") & "." & Ext
            If Ext = "emf" Or Ext = "wmf" Then
                sld.Export fname, Ext
            Else
                sld.Export fname, Ext, w, h
            End If

            If JPEGHigh Then
                '압축률 95 jpg로 변환 저장 / 기본 85
                Call WIA_ConvertImage(fname, Left(fname, InStrRev(fname, ".")) & "jpg", JPEG, JPEGRate)
                Kill fname 'png 삭제
            End If

            i = i + 1
        Next sld

        MsgBox i & "개의 슬라이드 이미지 저장 완료"
    End With

End Sub
현재는 PNG 형식인데 JPG를 원하시면 Ext = "jpg"로 바꾸면 됩니다.
그런데 이렇게 .export 에서 jpg로 바로 저장하면 압축률을 지정할 수 없습니다.
jpg형식으로 저장하되 높은 화질의 압축률로 저장하려면 그보다는 Ext = "png"로 그대로 두고 JPGHigh = True 로 바꿔주세요. 이렇게 하면 일단 png로 저장한 후에 윈도우의 WIA 외부 라이브러리를 이용하여 압축률을 지정해서 다시 jpg로 변환하여 저장합니다. 사용된 코드는 아래를 참고해주세요.
Public Enum wiaFormat
    BMP = 0
    GIF = 1
    JPEG = 2
    PNG = 3
    TIFF = 4
End Enum

'---------------------------------------------------------------------------------------
' Procedure : WIA_ConvertImage
' Author    : Daniel Pineault, CARDA Consultants Inc.
' Website   : http://www.cardaconsultants.com
' Purpose   : Convert an image's format using WIA
' Copyright : The following is release as Attribution-ShareAlike 4.0 International
'             (CC BY-SA 4.0) - https://creativecommons.org/licenses/by-sa/4.0/
' Req'd Refs: Uses Late Binding, so none required
'
' Windows Image Acquisition (WIA)
'             https://msdn.microsoft.com/en-us/library/windows/desktop/ms630368(v=vs.85).aspx
'
' Input Variables:
' ~~~~~~~~~~~~~~~~
' sInitialImage : Fully qualified path and filename of the original image to resize
' sOutputImage  : Fully qualified path and filename of where to save the new image
' lFormat       : Format to convert the image into
' lQuality      : Quality level to be used for the conversion process (1-100)
'
' Usage:
' ~~~~~~
' Call WIA_ConvertImage("C:\Users\Public\Pictures\Sample Pictures\Chrysanthemum.jpg", _
'                       "C:\Users\MyUser\Desktop\Chrysanthemum_2.jpg", _
'                       JPEG)
'
' Revision History:
' Rev       Date(yyyy/mm/dd)        Description
' **************************************************************************************
' 1         2017-01-18              Initial Release
' 2         2018-09-20              Updated Copyright
'---------------------------------------------------------------------------------------
Public Function WIA_ConvertImage(sInitialImage As String, _
                                 sOutputImage As String, _
                                 lFormat As wiaFormat, _
                                 Optional lQuality As Long = 85) As Boolean
    On Error GoTo Error_Handler
    Dim oWIA                  As Object    'WIA.ImageFile
    Dim oIP                   As Object    'ImageProcess
    Dim sFormatID             As String
    Dim sExt                  As String

    'Convert our Enum over to the proper value used by WIA
    Select Case lFormat
        Case 0
            sFormatID = "{B96B3CAB-0728-11D3-9D7B-0000F81EF32E}"
            sExt = "BMP"
        Case 1
            sFormatID = "{B96B3CB0-0728-11D3-9D7B-0000F81EF32E}"
            sExt = "GIF"
        Case 2
            sFormatID = "{B96B3CAE-0728-11D3-9D7B-0000F81EF32E}"
            sExt = "JPG"    'sExt = "JPEG"
        Case 3
            sFormatID = "{B96B3CAF-0728-11D3-9D7B-0000F81EF32E}"
            sExt = "PNG"
        Case 4
            sFormatID = "{B96B3CB1-0728-11D3-9D7B-0000F81EF32E}"
            sExt = "TIFF"
    End Select

    If lQuality > 100 Then lQuality = 100

    'Should check if the output file already exists and if so,
    'prompt the user to overwrite it or not

    Set oWIA = CreateObject("WIA.ImageFile")
    Set oIP = CreateObject("WIA.ImageProcess")

    oIP.Filters.Add oIP.FilterInfos("Convert").FilterID
    oIP.Filters(1).Properties("FormatID") = sFormatID
    oIP.Filters(1).Properties("Quality") = lQuality

    oWIA.LoadFile sInitialImage
    Set oWIA = oIP.Apply(oWIA)
    'Overide the specified ext with the appropriate one for the choosen format
    oWIA.SaveFile Left(sOutputImage, InStrRev(sOutputImage, ".")) & LCase(sExt)
    WIA_ConvertImage = True

Error_Handler_Exit:
    On Error Resume Next
    If Not oIP Is Nothing Then Set oIP = Nothing
    If Not oWIA Is Nothing Then Set oWIA = Nothing
    Exit Function

Error_Handler:
    MsgBox "The following error has occurred" & vbCrLf & vbCrLf & _
           "Error Number: " & Err.Number & vbCrLf & _
           "Error Source: WIA_ConvertImage" & vbCrLf & _
           "Error Description: " & Err.Description & _
           Switch(Erl = 0, "", Erl <> 0, vbCrLf & "Line No: " & Erl) _
           , vbOKOnly + vbCritical, "An Error has Occurred!"
    Resume Error_Handler_Exit
End Function
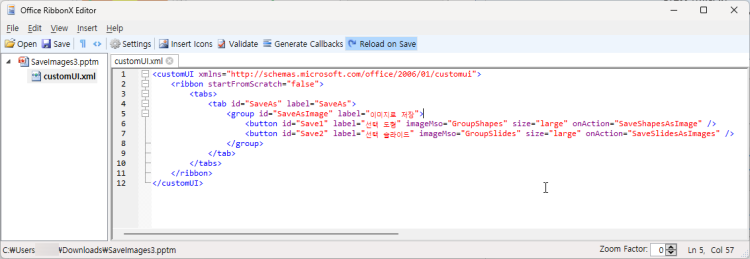
자주 사용한다면 위 기능을 추가기능으로 변환해서 리본메뉴에 추가할 수도 있습니다.
지식인 답변에 추가한 추가기능으로 만드는 방법입니다.

Insert를 누르고 2007 Custom UI를 추가하고 아래 내용을 붙여넣고 저장합니다.
저장 전에 Validate 를 눌러서 검사를 하는 것이 좋습니다.
<customUI xmlns="http://schemas.microsoft.com/office/2006/01/customui">
	<ribbon startFromScratch="false">
		<tabs>
			<tab id="SaveAs" label="SaveAs">
				<group id="SaveAsImage" label="이미지로 저장">
					<button id="Save1" label="선택 도형" imageMso="GroupShapes" size="large" _onAction="SaveShapesAsImage" />
					<button id="Save2" label="선택 슬라이드" imageMso="GroupSlides" size="large" _onAction="SaveSlidesAsImages" />
				</group>
			</tab>
		</tabs>
	</ribbon>
</customUI>
2. SaveImages2.pptm 을 열어서 리본메뉴가 생기는지 확인 하고
파일 > 다른이름으로 저장에서 ppam 으로 저장합니다.
기본 추가기능(Addins) 폴더에 저장하는 것이 편합니다.

3. 다시 파일 > 옵션 > 추가기능 > PowerPoint추가기능으로 이동을 누르고
추가기능 대화창에서 '새로 설치'를 누르고 방금 저장한 ppam 을 지정하고 확인을 누릅니다.

그러면 메뉴가 원래 있던 메뉴외에 한개 더 중복으로 생기게 됩니다.
4. 최종 확인을 위해 파워포인트를 종료하고 재시작합니다.

기능을 테스트합니다.
아래 첨부파일(SaveImages3.pptm) 다운로드한다면, 파일 우클릭 > 파일속성에서 차단해제하고
위의 2번 작업부터 하시면 됩니다.
다른 이름으로 저장 > ppam 추가기능으로 저장한 다음, 재시작하고 파워포인트 추가기능으로 추가하세요.
지식인 관련,
[2024.06.17 추가] 위 기능에 추가적으로 모든 슬라이드를 투명한 PNG로 저장할 수도 있는 버전입니다.
투명으로 저장하는 이유는 슬라이드에 자막 등을 입력하고 모든 슬라이드로 투명 png로 추출해서 영상에 덮어씌우는 작업 등에 필요합니다.
작업순서:
1) 아래 첨부파일을 다운 받아 파일속성에서 '차단해제' 후 확인 누르고 열 때 반드시 매크로를 허용합니다.
2) 투명한 이미지로 저장한 pptx 파일을 열고 Alt+F8을 누르고
3) 매크로파일 위치를 첨부파일 SaveAsPNG1.pptm 으로 선택 후
4) SaveSlidesAsTransparentPNG 을 실행합니다.

코드:
Option Explicit

Sub SaveSlidesAsT______________()

End Sub

Sub SaveSlidesAsTransparentPNG()

    Dim choice As VbMsgBoxResult
    Dim prs As Presentation
    Dim sld As Slide
    Dim shp As Shape, Tshp As Shape, Eshp As Shape
    Dim SW!, SH!, dSize%, uSize%, oldWidth As Single
    Dim usr As String, strFile As String

    On Error Resume Next
    Set prs = ActivePresentation
    With prs.PageSetup
        SW = .SlideWidth: SH = .SlideHeight
        If SW > SH Then dSize = SW * 0.75 Else dSize = SH * 0.75
    End With

    choice = MsgBox("모든 슬라이드를 기본사이즈(" & dSize & "px)의 투명 PNG로 저장합니다." & _
        vbNewLine & vbNewLine & _
        "기본 사이즈는 예(Yes), 원하는 사이즈가 있다면 예(No), 종료는 취소(Cancel)을 누르세요", _
        vbYesNoCancel, "SaveSlidesAsPng")
    If choice = vbNo Then
        usr = InputBox("저장할 이미지의 긴쪽 크기를 px단위로 입력하세요", "SaveSlidesAsPNG", 1920)
        If Not IsNumeric(usr) Then MsgBox "숫자만 입력하세요": Exit Sub
        uSize = CInt(usr)
    ElseIf choice = vbCancel Then
        Exit Sub
    End If

    For Each sld In prs.Slides

        sld.Select
        Set Tshp = sld.Shapes.AddTextbox(msoTextOrientationHorizontal, 0, 0, SW, SH)
        Tshp.Name = "temp box"
        sld.Shapes.SelectAll

        With ActiveWindow.Selection.ShapeRange

            strFile = prs.FullName
            strFile = Left(strFile, InStrRev(strFile, ".") - 1) & "_" & Format(sld.SlideIndex, "000") & ".png"

            If choice = vbYes Then
                .Export strFile, ppShapeFormatPNG
                DoEvents

            ElseIf choice = vbNo Then
                '//  긴쪽 길이를 원하는 px 크기의 이미지로 저장
                .Copy
                DoEvents
                Set Eshp = sld.Shapes.PasteSpecial(ppPasteEnhancedMetafile)(1)
                DoEvents
                Eshp.Left = 0: Tshp.Top = 0
                With Eshp
                    .LockAspectRatio = msoTrue
                    If .Width > .Height Then
                        .Width = uSize * 0.75 '// 1px = 0.75pt
                    Else
                        .Height = uSize * 0.75 '// 1px = 0.75pt
                    End If
                    .Export strFile, ppShapeFormatPNG
                    DoEvents
                    .Delete
                End With
            End If
        End With
        Tshp.Delete

    Next sld

    MsgBox "작업이 완료되었습니다.", vbOKOnly + vbInformation, "SaveSlidesAsPNG"
    Shell "Explorer " & prs.Path

End Sub
SaveSlidesAsTransparentPNG 매크로를 실행하면 아래와 같이 묻습니다.
Yes 는 기본사이즈로 저장하고, No 는 원하는 px 사이즈를 입력받으며, Cancel 은 취소합니다.

사이즈를 입력할 경우 px사이즈가 클수록 작업시간이 더 소요됩니다.
파일 첨부합니다.
✅ ✅ ✅
만약 각 슬라이드를 그림으로 저장하는 경우
자신이 원하는 이름으로 각각 저장하고 싶은 경우는 아래 답변을 참고하세요.
https://kin.naver.com/qna/detail.naver?d1id=1&dirId=102020103&docId=472190445&answerNo=2


'PPT+VBA' 카테고리의 다른 글
| 모눈 눈금 만들기 - 아래한글 또는 VBA 이용 (0) | 2022.01.20 |
|---|---|
| 다른 슬라이드를 붙여 넣을 때 색상이 달라지는 이유 (0) | 2022.01.07 |
| 타이머 회전 애니메이션 만들기 (0) | 2022.01.06 |
| 인쇄용 종이 크기와 파워포인트 슬라이드 크기 비교 (0) | 2021.12.30 |
| 타이머 바(bar) 만들기 2가지 방법 (0) | 2021.12.19 |
| 글머리 기호 일괄 삭제 (0) | 2021.12.11 |
| 파워포인트 내 문자열 검색 (0) | 2021.12.09 |
| 2007에서 애니메이션 복사 기능 구현 (0) | 2021.12.05 |


최근댓글